Patio Awning Fix
For those of you who have had, or worry about, problems with the patio awing unfurling while you are driving, here is one possible solution. Works for me. Click any of the images below to see the full size image.
The August 2001 issue of FMCA magazine had an article about patio awning latches made by ZipDee for their awings. The purpose of the latches is to keep the awning from unfurling while driving. The latch features a hook which attaches to the awing cover, and a loop which fastens to the side of the coach. One hook/loop latch is put on each end of the closed awning, about one foot in from the end of the roller. The hook is opened and closed using the wand you use to move the "awning down/awning up" lever on the front of the A&E awning. Very neat device, and should stop most awning unfurlings. Call ZipDee directly at their 800 number, ask for the parts department and buy 'em for $10.50 a pair, large size, plus shipping. They are also availale for window awnings, if you have a problem with them.
Only one problem. The ZipDee awning rollers, with aluminun covers, are only 4" in diameter, while the A&E and Carefree rollers are 6" in diameter. So the ZipDee latch is to small to fit on A&E awnings: the distance from the coach side to the center of the roller is 3" for the A&E awning and only 2" for the ZipDee awning. In order to work on the A&E awnings, the latch has to be tucked way-up under the rolled up awning where attaching it is a real problem. Or, the loop has to be put on a spacer which moves it out to the proper position. It needs to be moved away from the body side by 1" for a perfect fit.
Here is a picture of the modified latch attached to my 98 34Q:
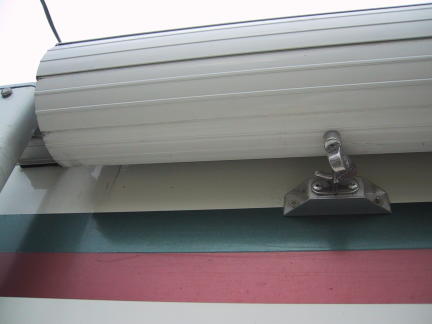
The spacer is very simple. It is made from a short piece of 1" square extruded aluminum, cut at forty-five degrees at each end to allow a pop-rivet tool to fasten the spacer to the coach side. The loop is also pop-riveted to the spacer.
Installation instructions:
- Buy a piece of 1" x 1" by 1' to 3' long square, hollow, extruded aluminum from Home Depot for about $6
- Make a 45 degree cut at one end of the aluminum. (Use a mitre box or a power saw with a blade that is suitable for aluminum,) Measure two inches back from the inclined end, and make a 45 degree cut in the opposite direction. That is your first spacer, with a two inch long flat space for fastening the loop.
- Measure 2" from the inclined end of the cut on the piece of aluminum that is left over, and make an opposite 45 degree cut. Viola! There is your second spacer.
- Drill a 3/16" diameter hole in each end of the spacer, 1/2" in from the end of the long side.
- Use the double sided tape furnished by Zip Dee in the latch package to mount a loop on the short side of one spacer. Drill holes through the loop and spacer, and pop-rivet the loop to the spacer. Since this is a metal-to-metal fastening, use an ordinary 3/16" diameter pop-rivet, not the ones supplied with the Zip Dee latches. The Zip Dee supplied rivets are specially designed to fasten the loop to the side of the coach, and should be used to fasten the spacer to the coach. (They mushroom out behind the outer wall and spread the load over a larger area).
- Fasten the second loop to the second spacer, repeating step 5. Here is the finished spacer, with loop attached, see photo below:
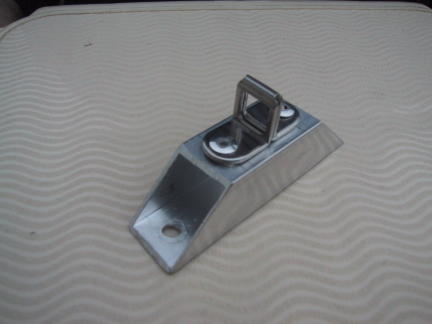
- Now go out to the motor home, and make sure your awning is furled up the way you want it to stay. Get a ladder and climb up the front end of the awning. Over the front door, make a mark about 10" from the front of the awning roller (towards the rear of the coach) and about on the bottom of the roller, 3" from the side of the coach. Hold the hook and loop/spacer up to the bottom ot the roller, and make sure that your mark is in about the right place. The tolerance for the hook engaging the hoop is very small. You want the latch to be snug, but if you move the hook to far away from the coach side, it won't engage the loop and you can't shift the rolled up awning very much. So make your final mark to fit your particular awning and latch assembly.
- Drill a 7/32" hole in the aluminum awning cover where you marked it in step 7. I drilled a 1/16" pilot hole first, to keep the final hole from "walking." BE CAREFUL to drill only through the aluminum cover, there is fabric underneath and you don't need to or want to drill through that.
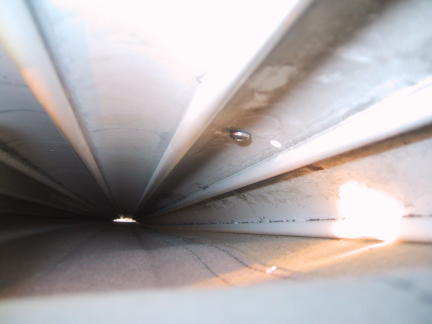
- Unroll your awning about two feet, until the aluminum awning cover is just unfurled. Move your ladder, and climb up to where you can reach in between the aluminum awning cover and the fabric underneath it, find the hole you just drilled, and insert the bolt for the hook up through the hole. Here is what you will see:
- Use a short Phillips head screw driver to hold the screw, and reach over the top of the awning and attach the hook. Make sure you use the little nylon washer on the inside and the large nylon washer on the outside. (I put a small flashlight in between the cover and the fabric so that I could find the screw when trying to hold it with the screwdriver.) Here is what the finished hook installation looks like from the outside of the aluminum cover while unfurled as in this photo:
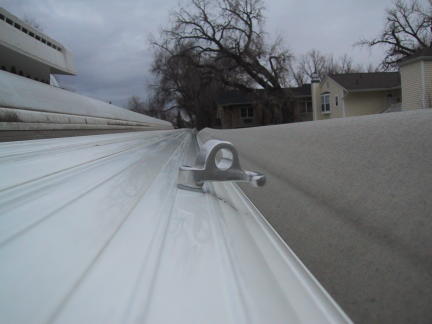
- Now furl the awing back up tight, the way you want it to be while traveling. If you use straps on your awning arms, use them now.
- Pull the hook into the latched position, and slip the hook over it, and hold the loop/spacer tight against the side of the coach. Make sure the hook is able to close without lifting the loop more than 1/16". If it is more than that, you won't be able to squeeze the awning enough to close the latch. If the hook is too far in, the latch will be loose and rattle and may not stay shut. So if you need to, be prepared to move the hook, marking where your second hole needs to be in terms of distance out from the side of the coach. You can then move this hole forward or backward to leave at least 1/2" of metal between the first and second holes, and repeat steps 7 through 11.
- With the hook and loop now fitting nicely, mark holes where you will rivet the spacer to the coach. Again, drill a 7/32" hole for each rivet (1/16" pilot holes suggested again). Put some silicone around each hole, insert the rivets in the spacer and push them up flush against the coach side. Now use your pop-riveter to set these rivets. Again, this is what the finshed latch should look like:
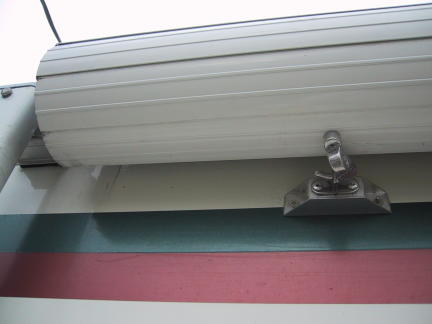
- Use your awning hook, and test how to open and close the latch. I found I could engage the hook in the hole in the latch, and turn and press in on the awning hook to make it work smoothly but snugly.
- Now repeat steps 7 through 13 for the other end of the awning roller.
- Ed Kennedy


