Copyright 2019 Discovery Owner's Association, Inc.

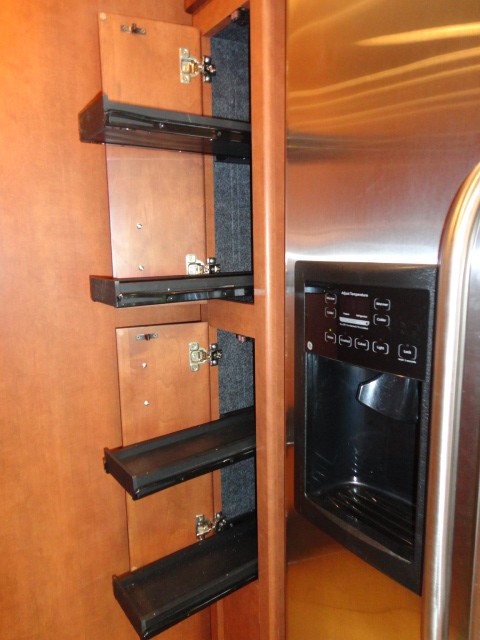
Sliding Pantry Shelves
2011 36J

  1. Remove existing shelves and the factory shelf brackets.
  2. You will need 1" X 6" lumber, ripped down to 4 7/8" for the shelves. The amount you need will depend on how may shelves you are going to make.
  3. Cut each shelf to 13 ½", assuming the depth of the cabinet is 14" as mine is.
  4. You will need ¼" X 2" lath for the end pieces, 2 for each shelf, cut to 5"
  5. As an option, you may want to buy a small piece of square stock (1/4") to add to the shelf sides to keep items from sliding off when you extend the shelf. I did this, the negative is that it cuts down the usable shelf width to 4 ½". Those pieces get attached on top of the shelf, not the sides.
  6. You will need 14" BOTTOM MOUNT sliding shelf brackets, 2 per shelf. I got mine at Home Depot.
  7. The interior width of the cabinet is 7", but the cabinet face is only 6". In order to have the shelf slide in and out freely, you need to shim the brackets prior to installing them on the cabinet walls. I used the same lath as above, with two pieces laminated together for each side. The easiest way to install the brackets is to fix them to the lath, pre-drill a couple of holes through the lath, and attach the bracket/lath assembly. There are multiple holes in the bracket you can use. I used two screws for each bracket.
  8. The other thing I did to keep items from sliding around, I put a non-slip shelf liner on the shelves prior to attaching the square stock.
  9. Everything was painted flat black prior to assembly. The brackets are already black.

Submitted by Jim Owens

WHO WE ARE

The DISCOVERY OWNERS ASSOCIATION, INC, was formed to promote the sharing of information and the camaraderie of fellow Discovery motorhome owners. Membership in the club is limited to owners of Fleetwood Discovery motorhomes.

GET IN TOUCH

Website Questions
Email Webmaster
Membership Questions
Email Membership Coordinator

SEARCH THIS SITE